Well If you have been here you might have probably seen my Joycon for PC guide.
Only sad thing is that with it being just in German, so it has very little audience. Well that changes with this Post.
Upon the Switch's arrival, posts have spawned all over the Internet that you can connect the Joycons to your PC via Bluetooth, but sadly you can only use them reasonable in the split-horizontal mode because of the key arrangement.
Well I see it quite a bit different.
as soon as I saw the articles I remembered that there are some tools that could do something Like that so I bought myself a pair of Joycons and got to search a bit, and I found everything, although while one of the tools I tried back then for remapping my DS4 was kinda limited and not supported anymore, the same dev threw out a new tool which was a lot better. and what makes it the best is that literally all the tools we use here are open source, meaning anyone intrested can take a look at the code and verify that no bad stuff is going on.
in most games or use cases you need a few tricks. things are different if you have a free floating button setup that can work with multiple contrrollers, like in virtualboyadvance you dont need this.
well one of the most known ways of doing the whole remapping story is JoyToKey, an honestly very nice tool I also use a lot and even paid for. it only has 2 disadvantages:
- it is only doing mouse/keyboard emulation, depending on the game you might be better of with a controller directly.
- JoyToKey is officially according to the website a shareware, which has to be bought for permanent use, although 7 Dollars is quite cheap.
Some things to note
so nobody will be shouting that this doesnt work properly or whatever.
- You need Administrative rights to install the driver for the virtual Gamepad
- after installing vJoy, the virtual controller is constantly active and listed in the gamepads, you might want to disable it when not in use, which is possible with the device manager although you might need admin rights this time as well, same for enabling it again)
- The Joycons arent siganling the joystick directly as a Joystick to the system but instead as a d-pad, meaning, you wont have analog controls, but the "sticks" on the virtual controller will behave digitally, in case we have some better drivers, I'll drop an Update (soemthing has been done, but nothing we can use yet, see at the bottom).
- It's a pure DirectInput solution. Although you can use x360ce to get xinput working too.
- Should be a given but I take no responsibility, no matter whether you break you joycons or accidentially start thermonuclear war by Pressing the SL button in Counterstrike.
What we need
- vJoy
- Universal Control Remapper (UCR)
- my configfile or alternatively, a bit of time to configure everything.
What to do?
It's best to have no controller connected since you booted the system last time and then connect the Joycons first left then right, otherwise you might get chaos.
for pairing the Joycons to your PC, make sure Bluetooth is enabled, and go to either "Printers and Ddevices" in the Control Panel or check the PC Settings for the Bluetooth settings part. In case you use the control Panel, click on add device.Tthe PC Settings you can use in Windows 8 and 10 automatically search for new devices. Now hold the sync button on one of your Joycons. A few seconds later, the "Joy-Con (L)" or "Joy-Con (R)" will appear on the list, click on it and then confirm that you want to add it. Repeat the same with the other one.
Small but important piece of advice, if you were connecting your Joycon to an other device like the switch or another PC, you will have the "ghost" of the joycon still in your device list. (which is very annoying and something that wont happen for example in android) you have to remove the device (in the Control Panel rightclick -> Remove Device, in the PC Settings, just click the ghost and then on the Remove button)
Now that preparation is over let's get to work.
- Download the vjoy setup from the link above and install it. it will ask about installing a driver, which is completely normal as it will emulate a virtual Gamepad, so make sure to confirm that part.
- In the Start Menu (or in windows 8 the All Apps screen) will have some tools for working with the virtual controller listed.
select "Configure vJoy" from those and if it isn't already created by default, create device 1. you need to set 4 axes, X,Y,Rx, and Ry (also Called, X-Rotation, or XR in short and Y-Rotation, or YR for short respectively), 1D-Pad (Labeled POV) with continuous as setting. and a bunch of keys. to use all of the available keys, we need 18 of them, so to summarize- 18 keys
- 4 axes: X,Y,Rx,Ry
- 1 POV/continuous
- Download UCR and extract it at any place you like.
- If you want to use my Config file, also download that and throw it right at the same folder here the UCR.exe resides.
- Start UCR
- In Case my Config is used, it will automatically vanish in the SysTray, leaving an icon behind (the icons next to the Clock) with an AutoHotKey icons (white H on green background) which you can use to open it again if needed.
- During the whole Config Process you can use the Monitor vJoy software, or the controller properties from the control Panel to test that everything works as planned.
- Now for the real party can Start. If you didnt use my config, you now need to configure each button, if you did use it, you can skip this step (but at least check that everything works) or change the settings any way you like.
- If not already the case, select the default profile, that way we can make more profiles for a ton of stuff later without this one getting in the way, but let's fist do a basic controller setup.
- For the Normal Buttons we do the following:
- first you need to Create a "Remapper - Button to Button" list entry, also called a "plugin", you should give it a meaningful name to keep track, but don't need to.
- then you Click "Input Button" and "Select Binding" in the popup. You will be ask to press your controller button. Press whatever button you want to set.
- Then for Output Button you select "vJoy Stick" -> "1" and then click the button again and select from the "vJoy Buttons" the button you want, but since with up to 128 Buttons it can be quite chaotic, the menu has been split in groups of 16, meaning for Button 1 you need to go through "vJoy Buttons 1-16" and then "1".
- for the D-Pad The Process is essentially the same.
- for the sticks it's a bit different though.
- Due to the situation with the annoying default Drive we now need a "Remapper - Button to Axis" Plugin for each of the axes, so 4 in total.
- For the Input Buttons, you have Low and High on each. go to "Select Binding" and press the appropriate diretion on that stick for the axis. (low= left/up, high=right/down)
- For the Output we once again select our vJoy 1 and then the target axis.
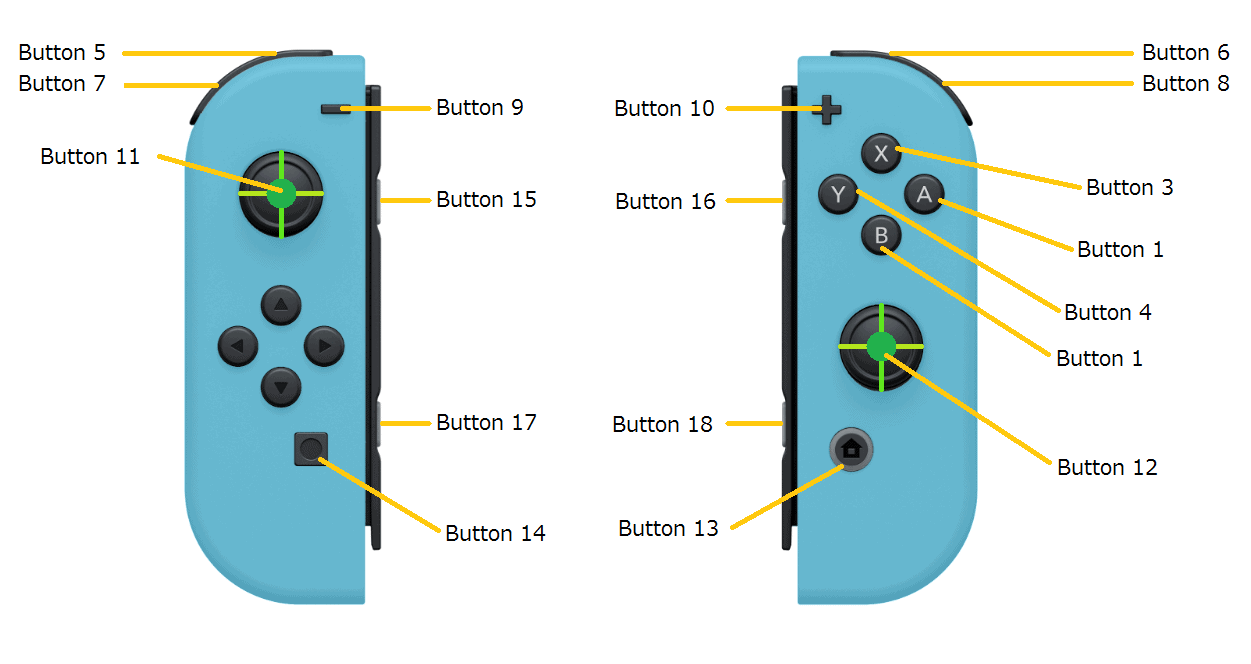
Just for reference, here's what I use:
- Buttons:
- 1-4: A, B, X, Y
- 5-8: L1, R1, L2, R2
- 9-14: -, +, LS, RS, Home, Screenshot
- 15-18: SL (Left Joycon), SR (Right Joycon), SR (Left Joycon), SL (Right Joycon)
- D-Pad is obvious
- Axes: X and Y for the left stick, Rx and Ry for the right one.
to make it more understandable, I made a picture of everything:
Driver Situation
As a small update to the Original Guide, there are some news regarding the kind of bad standard driver.
at Devpost, someone submitted something for a joycon Driver for the Bitcamp, which is already over, and maybe we may see something soon.
Update 20th June 2017
Updated link to configfile